4.7.2. Deploying SIMP Environments
SIMP fully supports Puppet Environments, and extends the practice by providing parallel environment directories to manage data that does not belong in a control repository.
This section describes how SIMP interacts with Puppet environments, and how to integrate SIMP environments into your site’s deployment strategy.
4.7.2.1. SIMP Environments
The term “environment” is heavily overloaded when discussing SIMP, Puppet, DevOps, and IT in general. We attempt to make the following distinctions:
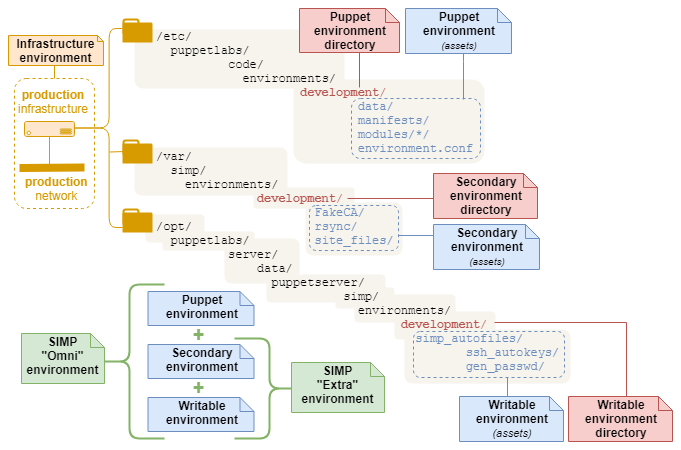
A full SIMP “Omni” environment is composed from three corresponding environments:
Environment |
Description |
|---|---|
Puppet |
|
Secondary |
|
Writable |
|
Each environment has an associated directory:
Puppet environment directory
A single directory at
$codedir/environments/<environment_name>Contains the Puppet code and Hiera data needed to manage a Puppet environment:
site manifest(s), Puppet modules, Hiera data (Hiera 4+), and Hiera hierarchy (Hiera 5+).
Assets can deployed using
r10kor Code Manager:r10k deploycreates one Puppet environment directory per control repository branch.r10k puppetfile install(using default settings) can be run at the top level of a Puppet environment directory to deploy its modules from the localPuppetfile.
Secondary environment directory
SIMP, by default, supplements each Puppet environment with a Secondary
environment directory, located on the SIMP server at
/var/simp/environments/<environment_name>.
This space holds all static, non-Puppet created files. It is generally used for
large binary items that will be delivered via rsync, and for files that are too
dangerous to add to a version control system. These include things like the
SIMP rsync materials (rsync/), the
Infrastructure Certificates
(site_files/pki_files/files/keydist/), and the krb5 Puppet module
(site_files/krb5_files/files/keytabs).
As you add new Puppet environments, you will need to replicate the appropriate Secondary directory structure here.
Note
For more information on the SIMP rsync structure, please see HOWTO Work with the SIMP Rsync Shares
Writable environment directory
SIMP also maintains Writable environment directories in parallel with each
Puppet environment at
/opt/puppetlabs/server/data/puppetserver/simp/environments/.
This space holds all non-static, Puppet Server created files. It is used
for content that can be generated during catalog compilation, such as
simplib::passgen() and ssh::autokey(),
Warning
You should never need to manually adjust anything in this directory space.
Building on the environments above, it is useful to consider the following “meta” environments:
Environment |
Description |
|---|---|
SIMP “Omni” environment |
|
SIMP “Extra” environment |
|
Infrastructure Environment |
|
Scaling considerations for Extra (Secondary and Writable) environment directories
Secondary and Writable environment directories pose a problem for Puppet scaling:
Load-balanced compile servers must keep the contents of both secondary and writable environment directories in sync across all compile servers.
Alternatively, disciplined use of Hiera Eyaml encryption must be used to replace all parameters that default to using Writable-environment functions like simplib::passgen().
4.7.2.2. Deployment Scenarios
SIMP supports deploying Puppet code using r10k or Code Manager, even when its modules are installed from RPMs. However, deployment strategies vary widely, based on a site’s infrastructure, existing policies, and administrative considerations. SIMP broadly groups these strategies into high-level deployment scenarios, with some important variations:
Deployment Scenario |
Variation |
r10k command |
Control Repository? |
Module Repos |
Autodeploy? |
|---|---|---|---|---|---|
|
No |
Local (from RPMs) |
|||
|
Yes |
Remote (Git hosting service) |
|||
|
✓ |
||||
|
✓ |
Regardless of the deployment scenario and variation employed, it is important to ensure that each Puppet environment is associated with an appropriate SIMP Omni-environment, or that the data provided by SIMP’s “Extra” environments are handled by alternate means.
4.7.2.2.1. Local deployment scenario
The Local deployment scenario deploys Puppet modules from
Local Module Repositories into an existing Puppet
environment’s modules/ directory.
This scenario requires the least preparation: it doesn’t require a control
repository, a remote git-hosting service, or even a functioning network. It
also works automatically on any monolithic SIMP server (6.4.0+) that was
installed from ISO or RPM. In fact, the initial run of simp config uses
this method to deploy the system’s first modules into the production
environment.
The local deployment scenario is recommended for:
Systems that don’t have access to a git-hosting service
Users who prefer to treat the SIMP framework as a vendor-packaged appliance
Users who prefer to avoid maintaining a control repository
It requires:
SIMP RPM-delivered Local Module Git Repositories
The
simpcommandA pre-existing Puppet environment directory (
simp environment new)A simp Puppetfile (
simp puppetfile generate)No additional compile servers.
Important
The local deployment scenario is only suitable for a single monolithic SIMP server.
Note
If you need to scale beyond a single server, you should deploy from a control repository.
4.7.2.2.1.1. Deploying from Local module repos
This is the initial deployment scenario immediately after Installing SIMP from an ISO.
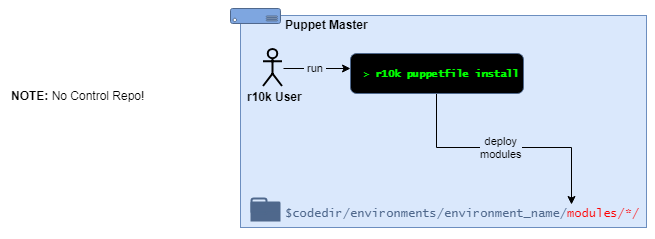
Under this scenario, a local r10k user will:
cdinto an existing Puppet environment directoryUse the command
r10k puppetfile installto deploy the modules defined in the localPuppetfile(which may include a separatePuppetfile.simp)
Notes:
The Puppet environment directory and
Puppetfilemust exist beforer10k puppetfile installis runThe modules in the
Puppetfileare defined withfile://URLs, and pull from Git repositories on the local file system
4.7.2.2.2. Control Repository deployment scenario
The Control Repository deployment scenario deploys complete Puppet environments from a remotely-hosted Control Repository.
SIMP administrators must ensure that each deployed Puppet environment is associated with an appropriate SIMP Omni-environment (or doesn’t need to be). A good starting point is to review the article, HOWTO Set up a SIMP Environment in a Control Repository
The Control repository deployment scenario is recommended for:
Environments that manage their infrastructure as code
Infrastructures that need to scale beyond a single server (e.g., compile servers)
Administrators who are comfortable with git and Puppet control repositories
Puppet Enterprise users
It requires:
A remote git-hosting service
A (remotely-hosted) Control Repository
r10k and/or Code Manager, configured to deploy from the Control Repository
Keeping all remote Puppet module repositories (and the control repository’s
Puppetfile) up-to-date as SIMP RPMs deliver new module versions to the server’s local filesystem
Depending on the variation, it may also require:
(optional) a local webhook on the Puppet Server, configured to trigger the code deploy
(optional) a webhook on the git-hosting service to trigger environment deployments on the Puppet Server after a control repository branch is updated
Important
Control repository deployment scenario administrators are expected to:
Have sufficient expertise to understand and manage the requirements above
Review and understand the documentation at HOWTO Set up a SIMP Environment in a Control Repository
Understand the relationship between a deployed Puppet environment and the larger SIMP Omni-environment
4.7.2.2.2.1. Manual r10k deploy
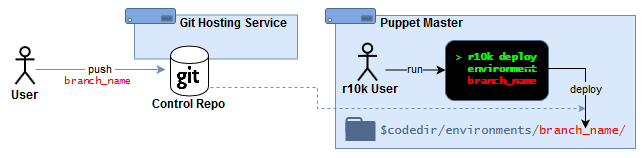
Under this scenario:
Puppet admins maintain a Puppet control repository (and Puppet module repositories) in an external git-hosting service.
An r10k user logs into the Puppet Server and manually deploys entire Puppet environment directories (one per branch) from the command line:
r10k deploy environment [ENVIRONMENT]r10k puppet code deploy [ENVIRONMENT](Puppet Enterprise)
4.7.2.2.3. Webhook-triggered r10k deploy
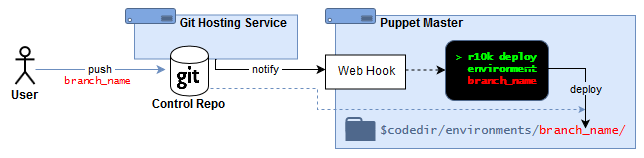
Under this scenario, Puppet admins:
Maintain a Puppet control repository (and Puppet module repositories) in an external git-hosting service
Deploy a Puppet environment by pushing updates to a control repository branch
When a control repository branch is updated, it automatically triggers an environment deployment on the Puppet Server:
The Git-hosting service uses a webhook to notify the Puppet Server about the branch that was changed
The webhook on the Puppet Server triggers r10k to deploy the branch as an environment
4.7.2.2.4. PE Code Manager
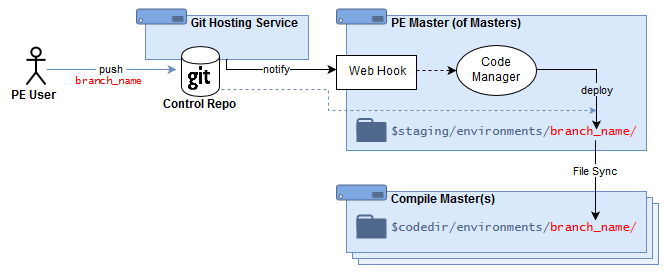
Under this scenario, Puppet admins:
Maintain a Puppet control repository (and Puppet module repositories) in an external git-hosting service
Deploy a Puppet environment by pushing updates to a control repository branch
When a control repository branch is updated, it automatically triggers an environment deployment on the Puppet Server:
The Git-hosting service uses a webhook to notify the PE server/MoM about the branch that was changed
The webhook on the Puppet Server triggers PE Code Manager to deploy the branch as a staged environment
The PE File Sync service distributes the staged environment to any compile servers, and promotes the code from staging to live use.
4.7.2.3. Local Module Repositories
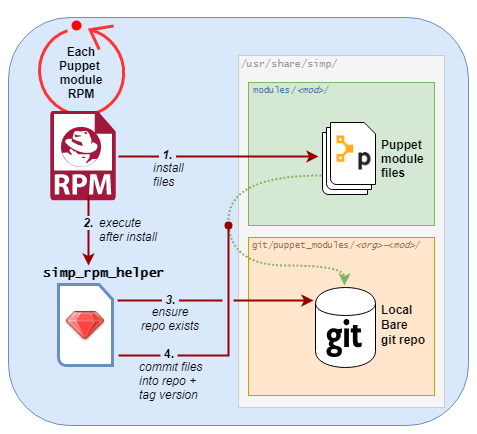
Each SIMP-packaged Puppet module RPM delivers it Puppet module content to two locations:
Under the directory
/usr/share/simp/modules/<module_name>/
These are reference files, and are recognized by package management tools like
rpm -qlandrpm -V
A tagged commit to a local Git repository at
/usr/share/simp/git/puppet_modules/<org>-<module_name>/
This repository supports
r10k puppetfile installand thesimpcommands, “puppetfile generate” and “environment new”The git repo and tags are created automatically during the RPM’s %postrun
When a SIMP-packaged Puppet module RPM is:
Installed, a new tag is created inside a new repository.
Upgraded, a new tag is created and all previous tags are preserved.
Removed, its local Git repository will remain on the filesystem (in case any Puppet environments still reference it).
The RPM’s %postinstall git management is handled by the simp_rpm_helper
script (from the simp-adapter package). It derives the repo’s name
(<org>-<module_name>) from module’s metadata.json file. The repo name
is guaranteed to be unique across all Puppet modules published to the
PuppetForge.
Note
The master branch in a SIMP RPM-created Puppet module Git repository
is a local transaction history of RPM-generated module tags.
It is NOT a copy of the module’s Git development history from its public repository.
It does NOT track the highest version available from the repository.
The branch head will be whatever the most recent successful RPM %postinstall was—even if that was a downgrade.
Therefore: your Puppetfiles should reference modules by tag (and never
master) when deploying from a SIMP RPM-created Puppet module Git
repository.
4.7.2.4. SIMP CLI Commands for Environment Management
The SIMP CLI provides commands to aid you in many facets of Puppet environment management. This section will explain the basics of each command, many of which were used in Creating and Deploying a Test Environment Using Local Module Repositories.
Note
All SIMP CLI environment management commands need to be run as root.
4.7.2.4.1. simp environment new
simp environment new creates a new SIMP Omni-Environment skeleton.
This allows sysadmins to create new, SIMP environments easily, when they
need to create a new Puppet environment.
By default, simp environment new creates a SIMP Omni-Environment skeleton,
which includes a Puppetfile that can be used to deploy Puppet modules from
local, SIMP-managed Git repositories. Its behavior, however, is quite
flexible. You can control which parts of the environment get created,
(including the Puppetfile) with its command options. You can even have it
deploy the Puppet modules using r10k puppetfile install, if you want it to
create the full environment in one step.
simp environment new options are documented in its built-in SIMP CLI
documentation. To see the options available, execute the following:
simp environment new -h
4.7.2.4.1.1. Default Behavior
When no options are specified, simp environment new <env name> takes the
following actions:
Creates the Puppet environment
/etc/puppetlabs/code/environments/<env name>from/usr/share/simp/environment-skeleton/puppet.
This includes creating the appropriate
environment.conffile from the skeleton’senvironment.conf.TEMPLATE.Generates the files
PuppetfileandPuppetfile.simpunder the new Puppet environment’s directory:/etc/puppetlabs/code/environments/<env_name>/ ├── Puppetfile └── Puppetfile.simp
This was equivalent to executing:
cd /etc/puppetlabs/code/environments/<env name>
simp puppetfile generate --skeleton > Puppetfile
simp puppetfile generate > Puppetfile.simp
See “simp puppetfile generate” for an explanation about the benefits of having these two Puppetfiles.
Creates the secondary environment
/var/simp/environments/<env name>from/usr/share/simp/environment-skeleton/secondary.Copies files from
/usr/share/simp/environment-skeleton/rsyncinto/var/simp/environments/<env name>/rsync.If any
tftpbootPXE image files can be found in directories matching/var/www/yum/CentOS/**/x86_64/images/pxeboot, copies those files into the appropriate sub-directory in/var/simp/environments/<env name>/rsync/RedHat/Global/tftpboot/linux-install.Creates a new FakeCA cacertkey file at
/var/simp/environments/<env name>/FakeCA/cacertkey. The file is populated with a random string.Re-applies the FACLs, SELinux contexts, and permissions to the newly-created directory trees.
Equivalent to executing:
simp puppetfile fix <env name>Does not create the Writable environment, because in this scenario, that environment will be automatically generated, as needed, when
puppetis run
4.7.2.4.2. simp environment fix
simp environment fix re-applies the FACLs, SELinux
contexts, and permissions to a SIMP Omni-Environment. This can be especially
useful, when you have added files to the environment and are unsure which
settings are appropriate for them.
By default, simp environment fix operates on all directories in the
SIMP Omni-Environment. However, its behavior is quite flexible. You can
control which parts of the environment get fixed with its command options.
simp environment fix options are documented in its built-in SIMP CLI
documentation. To see the options available, execute the following:
simp environment fix -h
4.7.2.4.2.1. Default Behavior
When no options are specified, simp environment fix <env name> , takes the
following actions:
Applies Puppet permissions (group) to
/var/simp/environments/<env name>.Applies Puppet permissions (user + group) recursively under
/etc/puppetlabs/code/environments/<env name>.Applies Puppet permissions (group) recursively under
/var/simp/environments/<env name>/site_files.Restores SELinux contexts under
/var/simp/environments/<env name>.Applies FACL rules to
/var/simp/environments/<env name>/rsync
4.7.2.4.3. simp puppetfile generate
simp puppetfile generate creates one of two different types of
Puppetfiles:
Puppetfile.simpThe SIMP-only Puppetfile, used to deploy SIMP’s Puppet modules from local SIMP-managed Git repositories. These local repositories are created/updated when SIMP-packaged Puppet module RPMs are installed. This file can be regenerated to deploy the version of each module under
/usr/share/simp/modulesusing the command:simp puppetfile generate > Puppetfile.simp
PuppetfileThe Parent Puppetfile, which deploys all modules from both Puppetfiles. Administrators can customize this file to declare any additional (non-SIMP) modules they may need. It also includes the content from the SIMP-only Puppetfile from the same directory. A fresh parent Puppetfile can be generated by running:
simp puppetfile generate --skeleton > Puppetfile
The files are kept side-by-side at the top level of each Puppet environment directory:
<puppet_environment>/
├── Puppetfile.simp
└── Puppetfile
simp puppetfile generate generates these two files separately so
administrators can manage any non-SIMP modules in the Puppetfile, while
permitting simp to regenerate Puppetfile.simp as the SIMP-only modules are
updated. r10k will deploy all the modules in both Puppetfiles.
If you want to update SIMP-only Puppetfile entries after installing/upgrading SIMP module RPMs, all you have to do is to execute:
simp puppetfile generate > <path to your environment>/Puppetfile.simp
Any Puppet modules defined in the parent Puppetfile will be unaffected.
For example, to update the SIMP-only Puppetfile created by simp config in
a standard SIMP server install from SIMP ISO or SIMP RPMs, execute:
cd /etc/puppetlabs/code/environments/production
simp puppetfile generate > Puppetfile.simp
4.7.2.4.3.1. Default Behavior: Generating Latest SIMP-only Puppetfile Content
When no options are specified, simp puppetfile generate, prints to the
console a Puppetfile that could be used to deploy the current set of SIMP Puppet
modules installed via RPM in /usr/share/simp/modules from the corresponding
local, SIMP-managed Git repositories in /usr/share/simp/git/puppet_modules.
Each Puppetfile entry will look like the following:
mod 'simp-simplib',
  :git => 'file:///usr/share/simp/git/puppet_modules/simp-simplib.git',
  :tag => '3.15.2'
The module name will be the name of the Puppet module in its metadata.json
file (<Puppet Forge org>-<module name>), the Git URL will be its local,
SIMP-managed Git repository, and the Git version will be the latest tag in
that local repository.
SIMP chose the naming convention to match that of PuppetForge.
Note
The corresponding SIMP-packaged Puppet module RPM name is
pupmod-<Puppet Forge org>-<module name>
4.7.2.4.3.2. Generating a Parent Puppetfile Skeleton
When the --skeleton option is specified,
simp puppetfile generate --skeleton prints to the console a parent
Puppetfile that includes Puppetfile.simp, the assumed name of the
Puppetfile containing only SIMP modules. This parent Puppetfile indicates
where you would add site-specific modules, that would be deployed along with
those in the included Puppetfile.simp. The Puppetfile.simp file is
assumed to be in the same directory as the parent Puppetfile.
Tip
You can optionally have local modules in a specified environment
automatically added to this parent Puppetfile using the --local-modules
SRC_ENV option. Local modules are modules whose directories are not under
Git source control and for which there is no local Git repository.
4.7.2.4.3.3. Other Options
The options simp puppetfile generate provides are documented in its built-in
SIMP CLI documentation. To see the options available, execute the following:
simp puppetfile generate -h
4.7.2.5. Examples for Deploying SIMP Environments
The example below steps through one way to set up a test environment. You might also find the following HOWTO documents to be helpful:
How To Generate a SIMP Puppetfile
Gives detailed examples of how to generate a Puppetfile for use with r10k from a Local deployment scenario or using Internet Repos.
How To Create a Control Repository
Gives examples of how to create Control Repos for use with r10k or Code Manager both from a SIMP installation and from the Internet Repos.
How To Set up the SIMP Provided ENC
Explains how to set up the ENC provided by the simp-util RPM. Once this is set up, the environment a node is assigned to can be set in using a configuration file located on the puppetserver.
4.7.2.5.1. Updating an Existing Environment
When you are using the Local deployment scenario the following steps can be used to update and deploy Puppet modules from the local git repositories to an existing environment or to update any of your site specific modules in your environment.
Update Site Specific Puppet Modules
Follow your site procedures to update any of your site specific Puppet modules.
Make sure all your modules have an entry in the
Puppetfile. See Edit the Puppetfile to include non-simp site modules for more details.Update SIMP Local Git Repositories
On the yum server (usually the SIMP server on smaller deployments) add any new or updated SIMP module RPMs to the yum repositories using your sites procedures.
On your SIMP server, clear the yum cache
yum clean all; yum makecache
Then install or update any modules
# For example if installing all the modules in simp-extras
yum install simp-extras
# or a simp Puppet module with a patch
yum update pupmod-simp-aide
This will update the local git repositories on the SIMP server.
Deploy the Environment
Generate the Environment’s Puppetfile.simp
Run simp to pull all the latest versions of the SIMP-packaged Puppet modules from the local git repositories:
# The environment in this example is called `test`.  Replace `test` with the
# name of your environment.
cd /etc/puppetlabs/code/environments/test
simp puppetfile generate > Puppetfile.simp
Verify the Environment’s Puppetfile
Make sure the
Puppetfileyou will be deploying from includes the following:A line that includes the
Puppetfile.simpwhich should look like:instance_eval(File.read(File.join(__dir__,"Puppetfile.simp")))
A line for each of your own modules. See How To Generate a SIMP Puppetfile for more information on how to generate and clean up the Puppetfile if needed.
Warning
Any module not listed in the
Puppetfilewill be deleted from the target environment’smodulesdirectory, when you use r10k to deploy the modules.Deploy the Modules
Use r10k to deploy the modules from the local Git repositories into the environment. Make sure the
umaskandgroupare set correctly so that the puppetserver has access to the files.# The environment in this example is called `test`. Replace `test` with the # name of your environment. ( umask 0027 && sg puppet -c '/usr/share/simp/bin/r10k puppetfile install \ --puppetfile /etc/puppetlabs/code/environments/test/Puppetfile \ --moduledir /etc/puppetlabs/code/environments/test/modules' ) Use the :command:`--force` option if you get warnings that local changes will get overwritten and you are sure you do not have changes that need saving.
Apply node configuration
Any new modules will now be available to use in configurations on your nodes in the updated environments. Any changes in updated modules will be applied on the next scheduled puppet run on any node in the environment. Run puppet agent -t to force puppet to run on any node in the environment if you do not want to wait for a scheduled run.
4.7.2.5.2. Creating and Deploying a Test Environment Using Local Module Repositories
This example uses the Local deployment scenario
It steps through creating a new SIMP Omni-Environment, for which the
SIMP secondary and writable
environments are linked to the corresponding directories in the existing production
environment. This will allow the two environments to use common passwords and
PKI certificates. It is helpful to test out changes in SIMP or other Puppet modules.
It assumes:
You have upgraded SIMP-packaged Puppet module RPMs via
yum.You have updated some of your own Puppet modules.
You want to create a
testPuppet environment with both sets of the changes.You want to assign a subset of nodes to this new environment to test the changes.
Create the new SIMP Omni-Environment
Run the
simpcommand to create a SIMP Omni-Environment calledtestfor which the SIMP secondary and writable environments are linked to the corresponding directories in the existingproductionenvironment.simp environment new test --link production
This will:
Create the Puppet environment
testCopy over the entire
productionPuppet environment over to thetestenvironment.Link the
testsecondary environment to theproductionsecondary environment.Link the
testwritable environment to theproductionwritable environment.
Update the Puppetfile Pair
Edit /etc/puppetlabs/code/environment/test/Puppetfile and add/update any of your own Puppet modules that you are updating.
Then update /etc/puppetlabs/code/environment/test/Puppetfile.simp using the following:
cd /etc/puppetlabs/code/environments/test
simp puppetfile generate > Puppetfile.simp
Deploy the Modules
Use r10k to update the modules in the test environment:
( umask 0027 && sg puppet -c '/usr/share/simp/bin/r10k puppetfile install \
--puppetfile /etc/puppetlabs/code/environments/test/Puppetfile \
--moduledir /etc/puppetlabs/code/environments/test/modules' )
Assign nodes to the new environment
Since the secondary and writable environments for the
productionandtestSIMP Omni-Environments are linked in this example, you can move nodes between these two environments without generating new certificates.You can assign the node to the new environment by changing the
environmentsetting in the node’s/etc/puppetlabs/puppet/puppet.conffile, or, if you are using the ENC supplied by the simp-util module, adding a line like the following to/etc/puppetlabs/puppet/environments.yaml.node.my.domain: test
Apply node configuration
To apply the configuration for a node in the
testenvironment, simply runpuppet agent -t
You should see a message similar to the following at the beginning of the log for the Puppet run:
Info: Using configured environment 'test'Note
Once you have deployed a Puppet environment, you can edit the modules in that Puppet environment directly to debug issues you may be having and run puppet agent -t to deploy those changes. However, the next time you use
r10kto deploy the modules, it will overwrite any local changes, unless the module is defined as:local => truein the Puppetfile. It is recommended that you usegitto manage your work flow.
4.7.2.5.3. Setting up a SIMP Environment in a Control Repository using Remote Git repositories
Although (with a detailed understanding of SIMP internals) you can have a SIMP server that will function with just a Puppet environment, by default, a functioning SIMP server requires its entire SIMP Omni-Environment.
This example creates a SIMP Omni-Environment skeleton whose Puppet environment you can check into a branch in your control repository.
This example assumes the new SIMP Omni-Environment will be using its own secondary and writable environments.
Before proceeding with this section, you should
Have a basic understanding of control repositories.
Have a basic understanding of how to use
git.Have a Git repository that you will be using as your control repository.
Have read Deploying SIMP Environments. It contains detailed descriptions of key topics:
local, SIMP-managed Git repositories maintained by SIMP Puppet module RPMs
SIMP CLI commands to assist with SIMP Omni-Environment management.
You may find it helpful to read the section that explains how a control repository works in Puppet, Inc.’s control repository documentation .
Install Prerequisite Packages
The following packages are required:
rubygem-simp-clisimp-environment-skeletonsimp-rsync-skeletonsimp-selinux-policy
All of these packages will already be installed if you have installed the SIMP server from ISO or from RPMs.
These RPMs can be obtained from an ISO or if the system has access to the internet the SIMP repositories can configured as described in Installing SIMP From A Repository.
yum install rubygem-simp-cli simp-environment-skeleton simp-rsync-skeleton simp-selinux-policy
Create the SIMP Omni-Environment skeleton without SIMP local repository Puppetfiles as
root:simp environment new dev1 --no-puppetfile-gen
This will create two skeleton directories:
a Puppet directory at
/etc/puppetlabs/code/environments/dev1.a Secondary directory at
/var/simp/environments/dev1.
A new Writable environment directory will be automatically generated, as needed, when
puppetis run.Generate the Puppetfile:
Download the
Puppetfileused to create a SIMP ISO for a specific release from the SIMP simp-core repository. In this example, we are going to use the SIMP6.4.0-0release.cd /etc/puppetlabs/code/environments/dev1 simp puppetfile generate --skeleton > Puppetfile curl -o Puppetfile.simp https://github.com/simp/simp-core/blob/6.4.0-0/Puppetfile.pinned
Manually edit the
Puppetfile.simpto remove components that are not Puppet modules, by deleting all lines up to and includingmoduledir 'src/puppet/modules'.Manually edit the
Puppetfileto add entries for any other non-SIMP modules your site requires.For more detailed information on editing these files see How to Generate a Puppetfile. This also explains how to create the Puppetfile if you are using Local Repositories instead of Internet Repositories.
Add/adjust any of the Hiera files in
/etc/puppetlabs/code/environments/dev1/dataCreate a New Branch in Your Control Repository
Create an empty git repository in the newly created Puppet environment:
cd /etc/puppetlabs/code/environments/dev1
git init .
Add all the files to a branch named for the environment in this repository:
# create the branch
git checkout -b dev1

# add the directory tree
git add --all

# verify the directory tree doesn't have any temporary files you created
git status

git commit -m 'Initial dev1 environment'
Push the branch to your control repository:
# Add a remote for your control repository
git remote add control_repo <URL to the control repo>

# Push the branch
git push dev1 control_repo
To continue configuring the environment, move on to the Client Management section in the SIMP User Guide.
By default, this environment will be using a different Certificate Authority for Infrastructure Certificates. It therefore may not be able to communicate to a server in another environment when certificate authentication is required, for example LDAP. You will have to create a new LDAP server or add the new CA to the list of trusted CAs in the other environment.
This environment will also generate a new set of passwords when simplib::passgen function is
used in a Puppet module. It therefore may not be able to talk to a server in another environment
that requires password authentication.